


Stop the Rattle: The Ultimate BMX “Dialing” Guide – Master the Spoke Sound Check
If you’ve been riding for more than a week, you know the feeling. You’re rolling up to the ledge, you pop a clean manual, and instead of the silent, buttery-smooth feedback of a pro-level machine, your bike sounds like a tin can full of loose change. That "rattle" isn't just an annoyance; it’s a signal that your bike is losing its "dialed" status.
In the BMX world, a "Dialed" bike is the ultimate badge of honor. It means every bolt is torqued, the chain has just the right amount of tension, and the wheels are rock solid. When a bike is dialed, it doesn't just feel better; it actually performs better. It transfers your pumping energy into speed more efficiently, and it survives the brutal impact of stair sets and heavy landings.
At SkatesUSA, we believe that maintenance shouldn't require a degree in mechanical engineering. To get your wheels perfectly tuned, you don't need expensive laboratory equipment. You just need your ears and the right technique. Welcome to the "Sound Check."
Why Your Spokes Are the Heart of Your Ride
Think of your BMX wheel as a high-tension suspension system. Your rim is held in place by a web of steel. When you use high-quality components like Mission BMX Spokes, you are installing the tendons that keep your wheel alive.
When all 36 (or 28, or 48) spokes are pulled to the same tension, the wheel is incredibly strong. It can withstand sideways casing on a quarter pipe and the vertical G-forces of a massive drop. However, as soon as one spoke vibrates loose, which happens naturally as the wheel "settles" or after a rough session, the balance is destroyed. The loose spoke stops supporting the rim, forcing the spokes next to it to take 200% of the load. This leads to broken spokes, cracked rims, and that dreaded "taco" shape that ends your session instantly.
The "Sound Check": Professional Results Using Only Your Ears
Many riders wait until they see a visible wobble in their rim before they reach for a tool. By that point, the metal has often already been stressed or bent. The pros use a "Sound Check" to catch problems before they become visible.
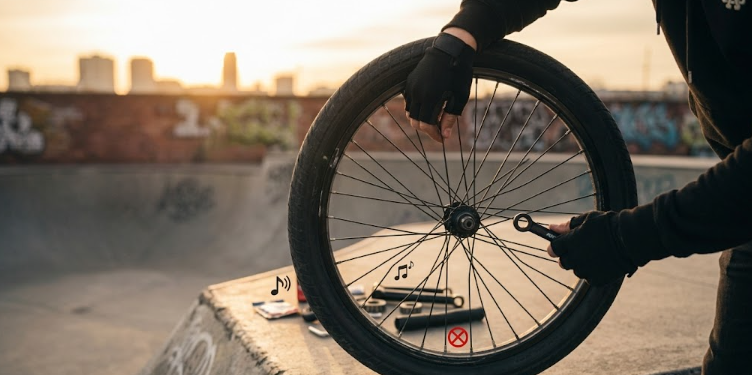
Step 1: The Pluck Test
This is the most effective way to diagnose a wheel's health in under sixty seconds.
-
Flip the Bike: Rest your bike on its seat and handlebars. Make sure you’re on a flat surface so the bike doesn’t tip.
-
The Technique: Give your front or rear wheel a gentle spin. As the spokes pass by your hand, use your fingernail or a small metal object (like a key or a hex wrench) to lightly "pluck" each spoke, exactly like you are plucking the string of a guitar.
-
The Coverage: Work your way around the entire wheel. Listen to the pitch of every single spoke on both the drive-side and non-drive-side.
Step 2: Decoding the Sound
As you pluck, you are looking for consistency.
-
The Perfect "Ping": A healthy, high-tension spoke will emit a clear, high-pitched ping. If the whole wheel sounds like a tuned instrument where every note is roughly the same, your wheel is dialed.
-
The "Dull Thud": This is your warning sign. If you hit a spoke and it makes a flat, dead "thud" or a low-frequency "clunk," that spoke has lost its tension. It is effectively doing nothing to help your wheel stay round. This is the source of your rattle.
-
The "Sharp Screech": On the flip side, if one spoke sounds much higher in pitch than all its neighbors, it is over-tightened. This often happens when someone tries to "true" a wheel by cranking on one spoke without loosening the others. An over-tightened spoke is a snap risk.
The Fix: Precision Tuning for the Streets
Once you’ve identified the "thudding" spokes, it’s time to bring them back into the harmony of the wheel. However, this is where most beginner mechanics ruin their rims. Wheel truing is a game of millimeters and patience.
1. Use the Right Gear
The most common mistake is using pliers or an adjustable wrench. The "nipple" (the nut that holds the spoke to the rim) is made of soft brass or aluminum. Pliers will round off the edges, making the wheel impossible to service in the future.
Invest in a dedicated tool. The Kink BMX Carabiner Spoke Wrench is the perfect example of "smart" gear. It’s a high-precision wrench that fits perfectly onto the nipple, and because it’s a carabiner, you can clip it to your belt loop or keys so you can "dial" your bike at the park between runs.
2. The "Small Steps" Methodology
To tighten a spoke, you turn the nipple. Remember: looking from the outside of the rim (the tire side) down toward the hub, counter-clockwise tightens the spoke.
-
Half-Turns Only: Never, ever tighten a spoke more than a half-turn at a time.
-
The Balancing Act: If you tighten one spoke too much, it will pull the rim toward that side, creating a "hop" or a "wobble."
-
Re-Check the Pitch: After every half-turn, pluck the spoke again. You are listening for that "thud" to transform into a "ping slowly." Once it matches the pitch of the healthy spokes around it, stop.
3. Check for "True"
After you’ve fixed the loose spokes, give the wheel a fast spin. Watch the gap between the rim and your frame stays (or your brake pads). If the rim stays perfectly centered as it spins, you’ve successfully dialed the wheel. If it wobbles, you may need to slightly loosen the spoke directly opposite the one you just tightened.
Maintenance as a Ritual
At SkatesUSA, we see it every day: riders bring in wheels that are destroyed, all because of one loose spoke they ignored for a month. A bike that rattles is vibrating itself apart.
Make the "Sound Check" part of your pre-ride ritual. Before you head out to the local spot:
-
Check your tire pressure.
-
Do a quick bolt-check on your stems and axles.
-
Perform the Pluck Test.
It takes less than a minute, but it ensures that your Mission BMX Spokes are doing their job and your Kink Spoke Wrench stays as your most used tool.
A silent bike is a fast bike. It’s a bike that feels like an extension of your body rather than a loose collection of metal parts. By mastering the art of spoke tension through sound, you’re not just fixing a rattle—you’re becoming a better mechanic and a more confident rider.
Keep it tight. Keep it silent. Keep it dialed.
Frequently Asked Questions
1. How often should I perform a "Sound Check" on my BMX wheels? For the average rider hitting the park or street daily, we recommend a quick Pluck Test once a week. BMX wheels endure massive lateral stress during grinds, spins, and heavy landings, which can cause spokes to settle or loosen. If you’ve just built a new wheel or bought a new bike, check the tension after your first two or three sessions, as new Mission BMX Spokes often "stretch" slightly as they seat into the hub and rim.
2. Can I use a regular wrench or pliers if I don't have a spoke wrench? Technically, you can, but you shouldn't. Using pliers or an adjustable wrench is the fastest way to "round off" a spoke nipple. Once the edges of the nipple are stripped, you won't be able to adjust the tension at all, often resulting in a costly repair where the spoke must be cut out and replaced. A dedicated tool like the Kink BMX Carabiner Spoke Wrench is designed to grip all four sides of the nipple securely, preventing damage.
3. What should I do if my spokes "ping" correctly but the wheel still wobbles? If your spoke tension sounds consistent (all high-pitched pings) but the rim still has a visible wobble, your wheel may be "out of true" or the rim itself might be bent. This usually happens if the wheel was previously adjusted incorrectly. In this case, you may need to tighten a group of 2–3 spokes on one side of the wheel while slightly loosening the 2–3 spokes directly opposite them to pull the rim back to center.
4. Is a "dull thud" always a sign of a loose spoke? Usually, yes. In a high-pressure system like a BMX wheel, any spoke that doesn't resonate with a clear note is likely under-tensioned. However, ensure that your finger or another spoke isn't accidentally touching the one you are plucking, as this will "dampen" the sound and create a false thud. Always pluck the spoke in an open area halfway between the hub and the rim for the most accurate sound.